Lecture 13: Spark Structured Streaming#
Learning objectives#
By the end of this lecture, students should be able to:
Understand the key components of a Spark Streaming job
Set up a sample word count streaming application
Set up a sample device reading streaming application
Learning resources#
Please check out Spark documentation for a comprehensive explanation of Spark Streaming
https://spark.apache.org/docs/3.4.0/structured-streaming-programming-guide.html
Environment set up#
Docker container set up#
A Docker container is a lightweight, portable, and self-sufficient unit that encapsulates an application along with all its dependencies, libraries, configuration files, and the runtime needed to run it. Containers provide a consistent environment that ensures an application runs the same way regardless of where it is deployed—whether it’s on a developer’s laptop, in a testing environment, or in production.
We will need the following:
Docker Installation: Download Docker Desktop here
Clone
worksheet6repoOpen a terminal, navigate to the
worksheet6folder. Type the following commanddocker compose up
This will start the installation of a docker container. Once it’s finished, you can open the Docker Desktop application and you should be able to see a ed-pyspark-jupyter-lab container available.
Set up jupyter lab container#
Open a web browser
Type
localhost:8888. This should prompted you to enter a token and set a password:Token: After setting up the docker container, in the terminal of the Docker Desktop, you should see something like
ed-pyspark-jupyter-lab  |     To access the server, open this file in a browser:
ed-pyspark-jupyter-lab  |         file:///home/jovyan/.local/share/jupyter/runtime/jpserver-18-open.html
ed-pyspark-jupyter-lab  |     Or copy and paste one of these URLs:
ed-pyspark-jupyter-lab  |         http://b31ebc725bbb:8888/lab?token=22f3585e75346a8260802bf34e412da59032c24ee77ab20d
ed-pyspark-jupyter-lab  |      or http://127.0.0.1:8888/lab?token=22f3585e75346a8260802bf34e412da59032c24ee77ab20d
Your token would be the string after the 'token='
Copy paste the token to the web browser and set a password easy to remember
[OPTIONAL] Use docker container in visual studio code#
Install the Docker extension in VScode
Open the Docker extension, you should be able to see the active container
ed-pyspark-jupyter-labRight click, and choose
Attach Visual Studio Code
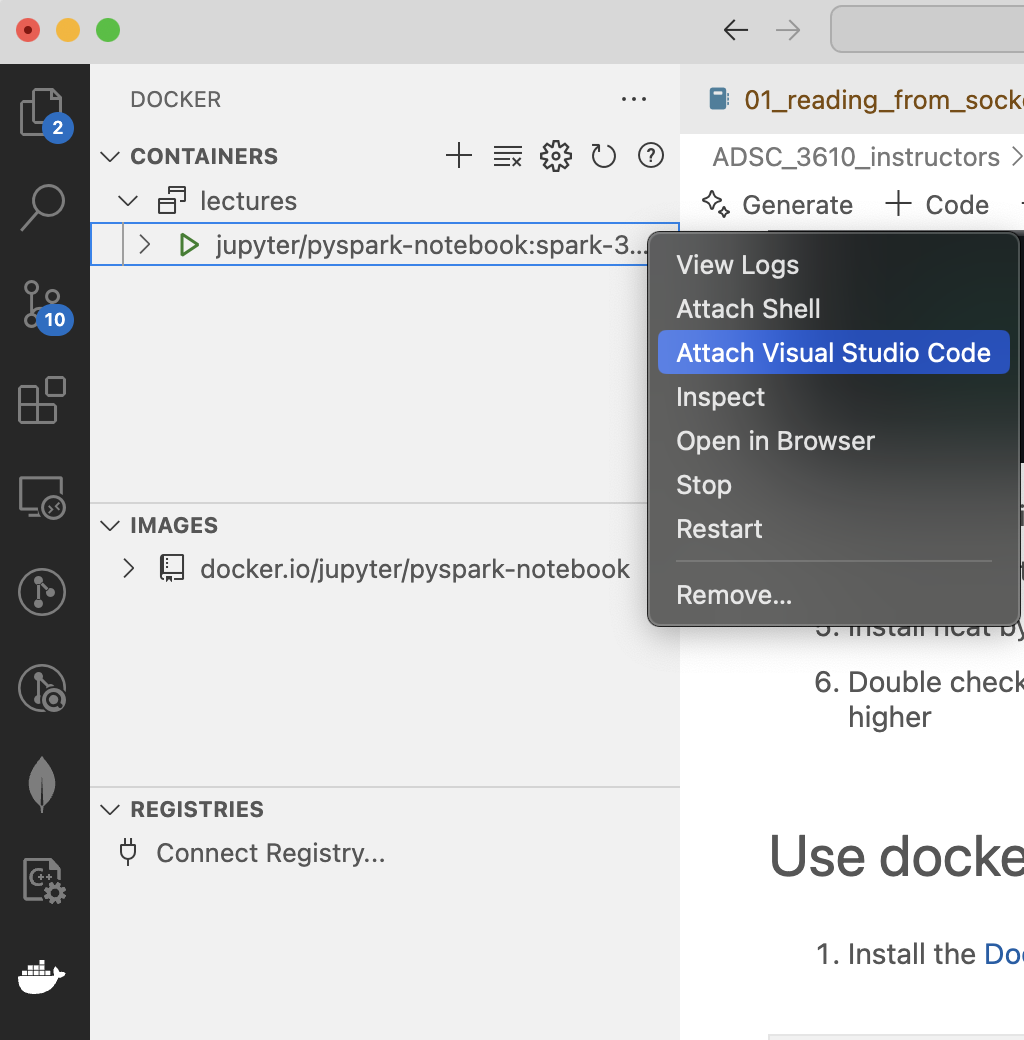
Now it will open a new vscode Window, you can navigate to your
worksheet6folder nowWhen open a jupyter notebook, you will need to select a kernel. Choose
Existing Jupyter Server. And pastehttp://127.0.0.1:8888/lab?token=[yourtokenhere]as the server
Install ncat in your docker container#
Netcat (commonly abbreviated as nc) is a versatile networking tool used for reading from and writing to network connections using TCP or UDP.
In this worksheet, you can use netcat to simulate a text stream by sending data over a network socket. This is particularly useful when testing real-time streaming applications that require a continuous data flow, like Spark Streaming applications.
Open a terminal
Type
docker exec -it [yourdockerIDhere] /bin/bashand replace the dockerID as appropriate
To find your docker container ID, open the Docker Desktop app and click on the ed-pyspark-jupyter-lab container. There’s should be a string of id that you can copy.

After step 2, it will open the docker container terminal. It should look something like
(base) root@a3a44383fb31:~#Update ubuntu by typing
sudo apt-get update. It will take a minuteInstall ncat by typing
sudo apt-get install ncat. Enteryto continuteDouble check if ncat has been installed successfully by typing
ncat -v. This should print out the ncat version 7.80 or higher
Spark Streaming basics#
Sensors, IoT devices, social networks, and online transactions all generate data that needs to be monitored constantly and acted upon quickly. As a result, the need for large-scale, real-time stream processing is more evident than ever before.
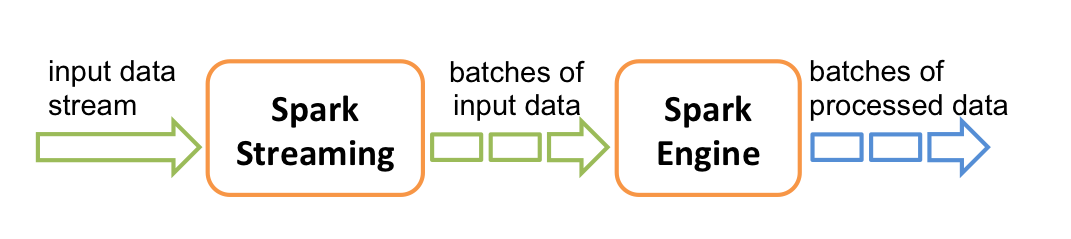
At a high level, Spark Streaming receives live input data streams and divides the data into batches, which are then processed by the Spark engine to generate the final stream of results in batches.
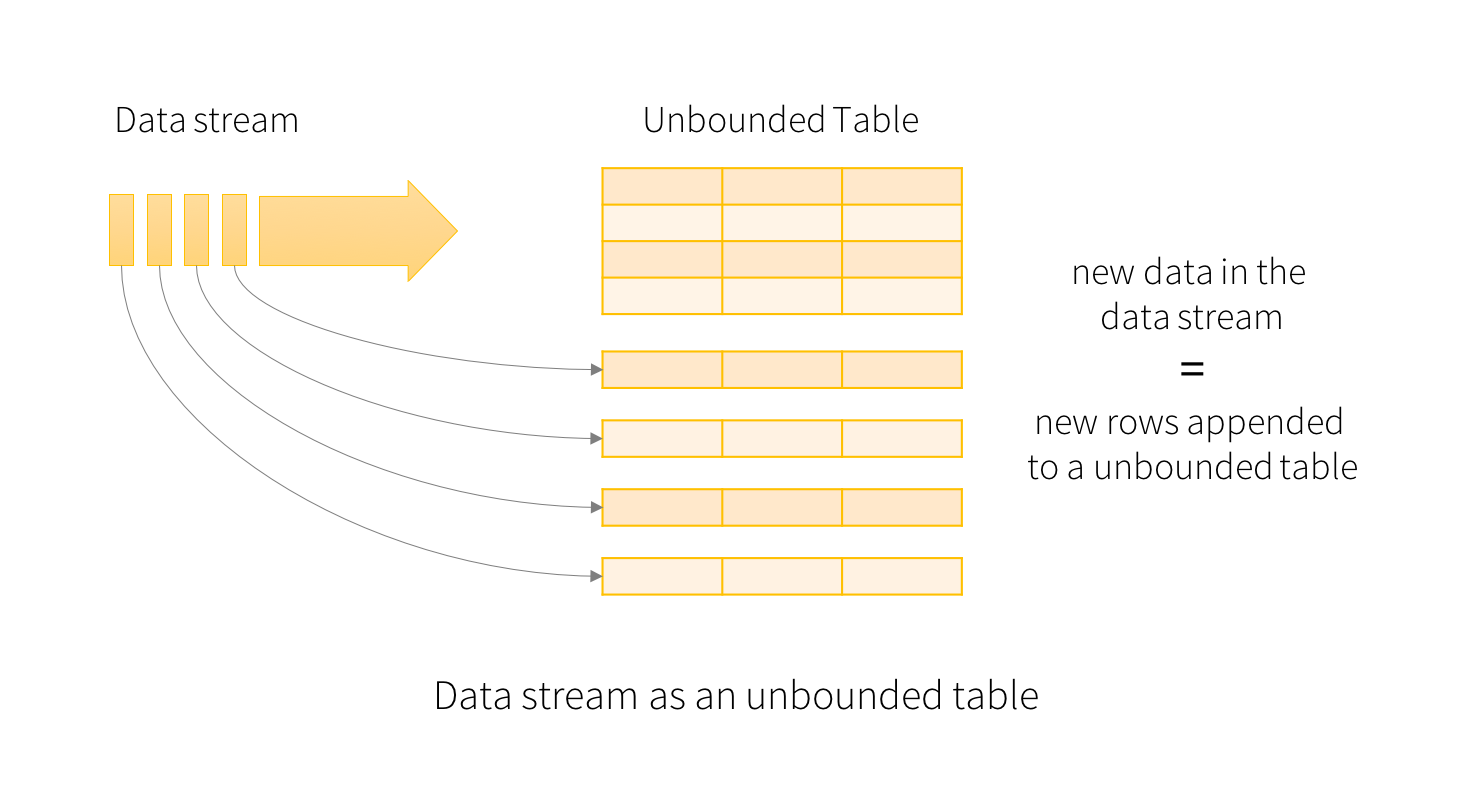
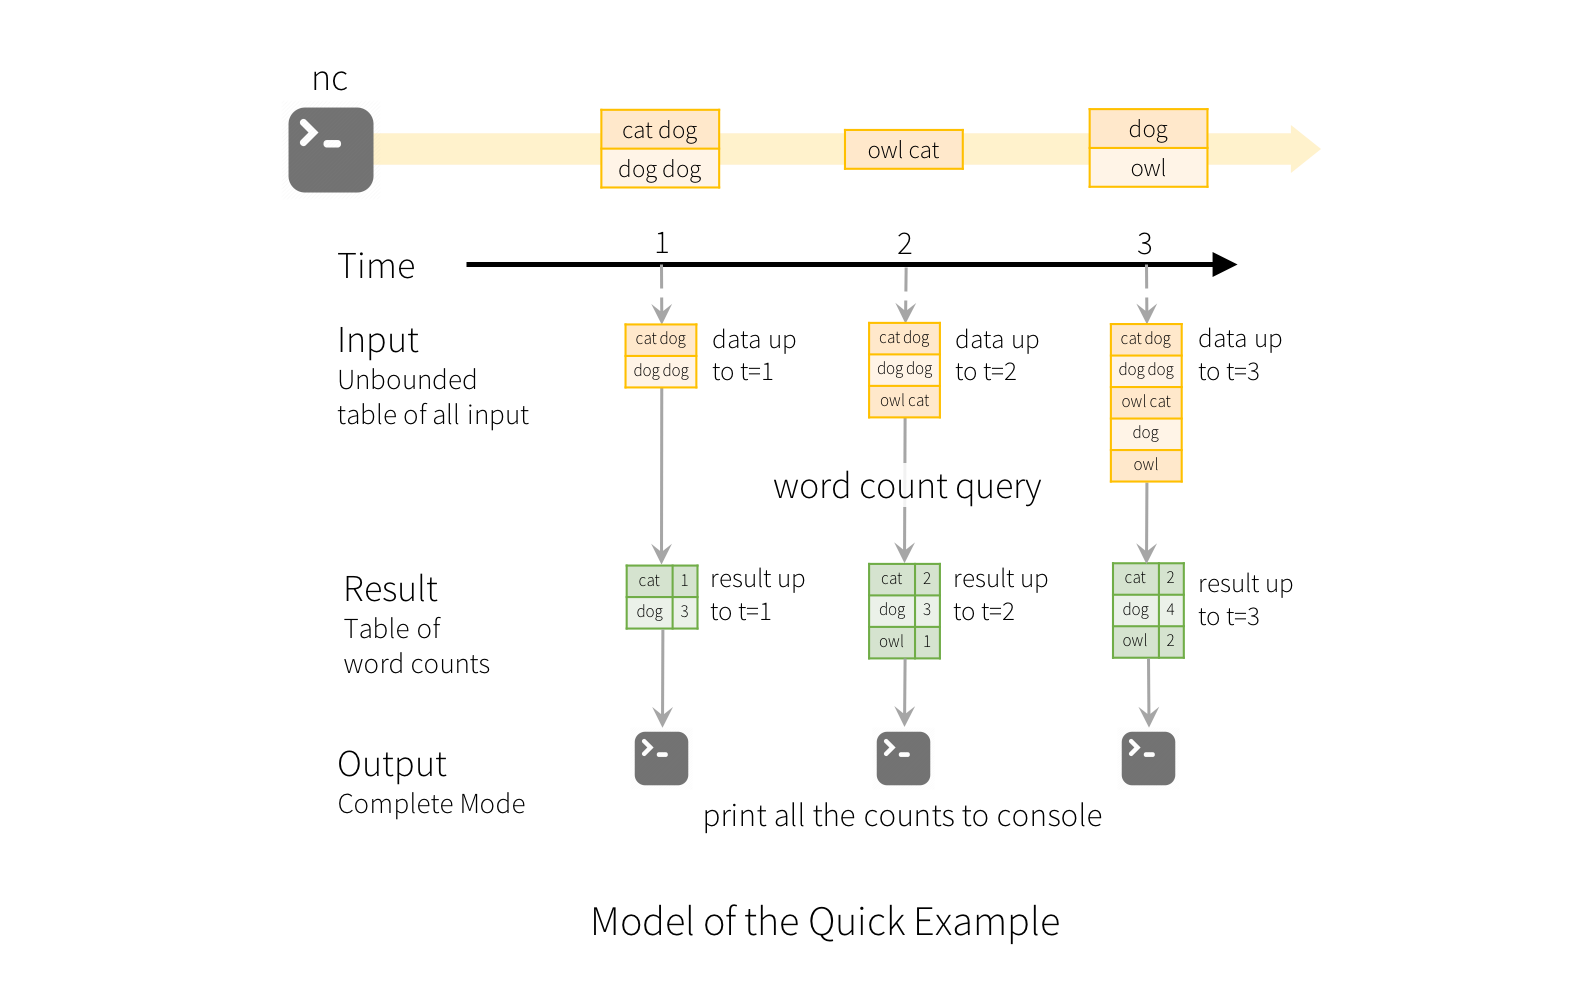
The key idea in Structured Streaming is to treat a live data stream as a table that is being continuously appended. This leads to a new stream processing model that is very similar to a batch processing model. You will express your streaming computation as standard batch-like query as on a static table, and Spark runs it as an incremental query on the unbounded input table. Let’s understand this model in more detail.
A query on the input will generate the “Result Table”. Every trigger interval (say, every 1 second), new rows get appended to the Input Table, which eventually updates the Result Table. Whenever the result table gets updated, we would want to write the changed result rows to an external sink.
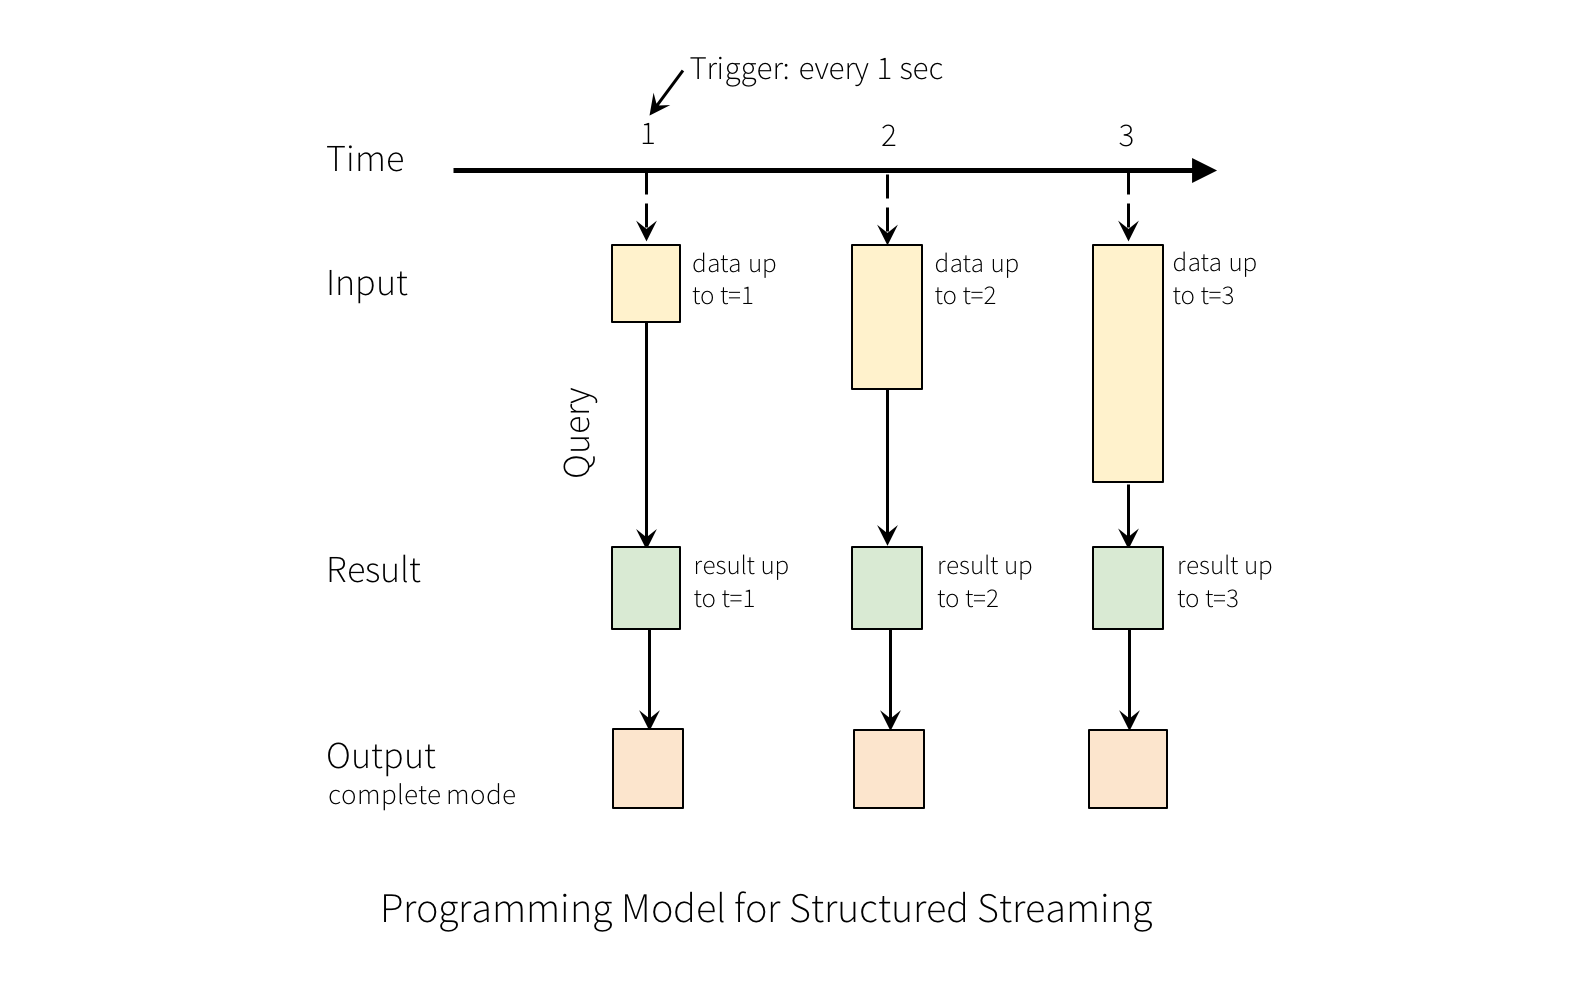
The “Output” is defined as what gets written out to the external storage. The output can be defined in a different mode:
Complete Mode - The entire updated Result Table will be written to the external storage. It is up to the storage connector to decide how to handle writing of the entire table.
Append Mode - Only the new rows appended in the Result Table since the last trigger will be written to the external storage. This is applicable only on the queries where existing rows in the Result Table are not expected to change.
Update Mode - Only the rows that were updated in the Result Table since the last trigger will be written to the external storage (available since Spark 2.1.1). Note that this is different from the Complete Mode in that this mode only outputs the rows that have changed since the last trigger. If the query doesn’t contain aggregations, it will be equivalent to Append mode.
Example 1: Real-time word count application#
Let’s initialize a SparkSession
from pyspark.sql import SparkSession

spark = SparkSession.builder.appName("SparkStreaming").getOrCreate()

# Set the number of shuffle partitions
spark.conf.set("spark.sql.shuffle.partitions", "4")
spark.sql.shuffle.partitionsThis configuration property determines the number of partitions to use when shuffling data for joins or aggregations. By default, Spark sets this to 200, but it can be adjusted based on the size of the data and the cluster resources.
spark
Let’s read in the sample text file in data/input/sample.txt
# read input data
# df_raw = spark.read.format("text").load("data/input/sample.txt")

# Streaming version
df_raw = spark.readStream.format("socket").option("host","localhost").option("port", "9999").load()
# df_raw.show()
.format("socket"):
Specifies the format of the streaming source.
“socket” indicates that the source is a socket stream, which means data will be read from a TCP socket.
Other options for format include:
Socket: Reads data from a TCP socket.
Kafka: Reads data from a Kafka topic.
File Source: Reads data from files (CSV, JSON, Parquet).
Rate Source: Generates data at a fixed rate (useful for testing).
Delta Lake: Reads data from Delta Lake tables.
Custom Source: Allows for custom data source implementations.
.option("host", "localhost"):
Sets the host option for the socket source.
"localhost"specifies that the data will be read from a socket on the local machine.
.option("port", "9999"):
Sets the port option for the socket source.
"9999"specifies that the data will be read from port 9999 on the local machine.
# df_raw.printSchema()
# df_raw.show()
# split the line into words
from pyspark.sql.functions import split

df_words = df_raw.withColumn("words", split("value", " "))
# df_words.show()
# explode the list of words
from pyspark.sql.functions import explode

df_exploded = df_words.withColumn("word", explode("words")).drop("value", "words")
# df_exploded.show()
from pyspark.sql.functions import lit, count

# aggregate the words count
df_agg = df_exploded.groupBy("word").agg(count(lit(1)).alias("count")).orderBy("count", ascending=False)
# df_agg.show()
Before excecute the next cell, you will need to activate netcat by typing in the terminal ncat -l 9999.
The command ncat -l 9999 is used to start a simple TCP server that listens for incoming connections on port 9999.
# Write the output to console streaming

df_agg.writeStream.format("console").outputMode("complete").start().awaitTermination()
.format("console"): Specifies that the output will be written to the console. Other options include:
Console Sink: Writes output to the console.
File Sink: Writes output to files (CSV, JSON, Parquet).
Kafka Sink: Writes output to a Kafka topic.
Memory Sink: Writes output to an in-memory table.
Delta Lake Sink: Writes output to a Delta Lake table.
Foreach Sink: Allows custom logic for each row in the output.
.outputMode("complete"): Sets the output mode to “complete”, meaning the entire result table is output each time it is updated.
.start(): Starts the streaming query.
.awaitTermination(): Blocks the current thread and waits for the streaming query to terminate.
In Spark Structured Streaming, there are three common output modes for writing streaming data:
1. Append Mode#
Description: Only the new rows added to the result table since the last trigger are written to the sink.
Usage:
df_agg.writeStream.format("console").outputMode("append").start().awaitTermination()
Use Case: Suitable for scenarios where you only need to process and output new data, such as appending new log entries or sensor readings.
2. Complete Mode#
Description: The entire result table is written to the sink every time it is updated.
Usage:
df_agg.writeStream.format("console").outputMode("complete").start().awaitTermination()
Use Case: Useful for aggregations where you need to output the entire result, such as computing running totals or averages.
3. Update Mode#
Description: Only the rows that were updated in the result table since the last trigger are written to the sink.
Usage:
df_agg.writeStream.format("console").outputMode("update").start().awaitTermination()
Use Case: Suitable for scenarios where you need to update existing records, such as maintaining a running count or updating the status of records.