Lecture 16: Model deployment with mlflow and streamlit#
Learning objectives:#
Learn how to track, package, and manage machine learning models using MLflow.
Understand how to create and deploy interactive web interfaces for model inference using Streamlit.
Learn how to integrate
MLflowmodels intoStreamlitapplications and deploy them to local production environments.
1. Introduction#
After training your machine learning model and ensuring its performance, the next step is deploying it to a production environment. This process can be complex, but MLflow simplifies it by offering an easy toolset for deploying your ML models to various targets, including local environments, cloud services, and Kubernetes clusters.

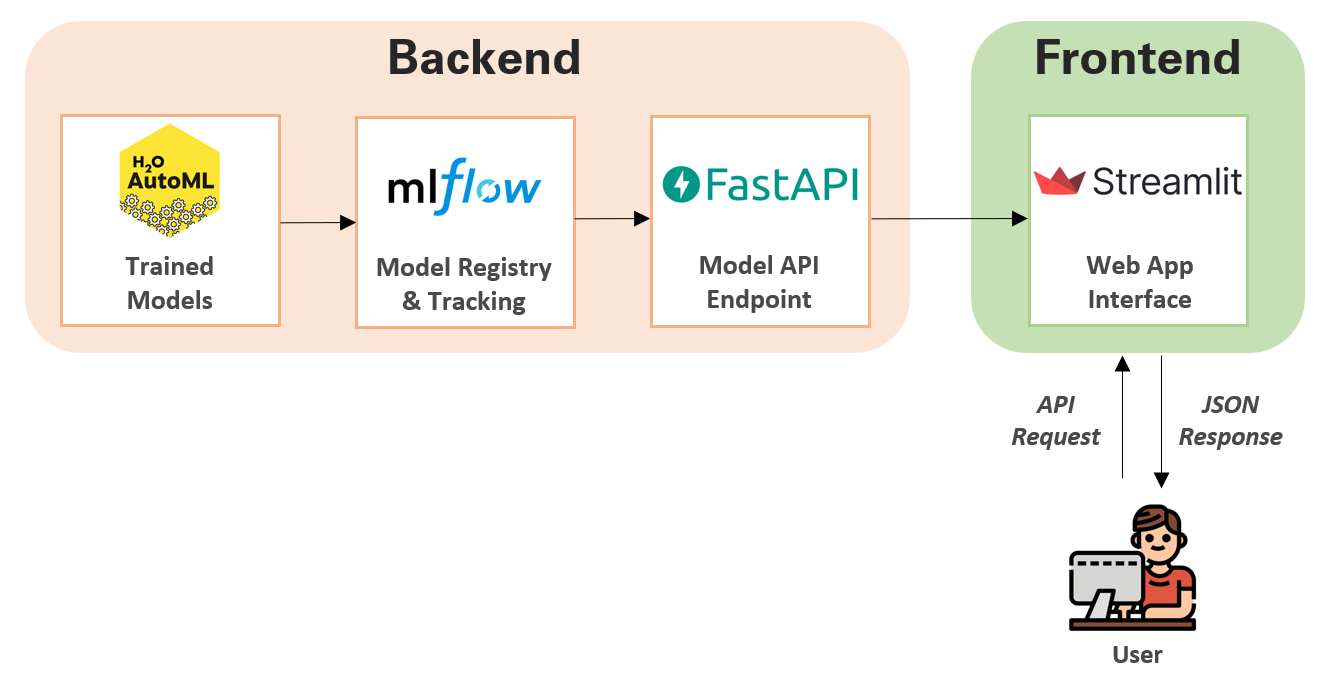
In today’s example, we will use mlflow to deploy our model locally and use streamlit as the front end
MLflow: An open-source platform to manage the ML lifecycle, including experimentation, reproducibility, and deployment.
Streamlit: An open-source app framework for Machine Learning and Data Science teams to create beautiful, performant apps.
2. Steps to Deploy a Model#
Train a Model: Train a simple classification model on the Iris dataset.
Log the Model with MLflow: Use MLflow to log the model.
Deploy the Model: Deploy the model using MLflow’s model serving capabilities.
Create a Streamlit App: Build a Streamlit app to interact with the deployed model.
3. Implementation#
Step 1: Start mlflow tracking server#
In terminal, run:
mlflow ui
Step 2: Train a Model#
# train.py
import mlflow
import mlflow.sklearn
from sklearn.datasets import load_iris
from sklearn.model_selection import train_test_split
from sklearn.neighbors import KNeighborsClassifier
from sklearn.metrics import accuracy_score
import pandas as pd

mlflow.set_tracking_uri(uri="http://127.0.0.1:5000")

# Load Iris dataset
iris = load_iris()
X = pd.DataFrame(iris.data, columns=iris.feature_names)
y = iris.target

# Split data
X_train, X_test, y_train, y_test = train_test_split(X, y, test_size=0.3, random_state=42)

# Start MLflow run
with mlflow.start_run() as run:
    # Train model with K=10
    knn = KNeighborsClassifier(n_neighbors=10)
    knn.fit(X_train, y_train)

    # Log model
    mlflow.sklearn.log_model(knn, "knn_model")
    accuracy = accuracy_score(y_test, knn.predict(X_test))
    mlflow.log_metric("accuracy", accuracy)

    print(f"Model logged with accuracy: {accuracy}")
2024/10/31 00:44:15 WARNING mlflow.models.model: Model logged without a signature and input example. Please set `input_example` parameter when logging the model to auto infer the model signature.
2024/10/31 00:44:15 INFO mlflow.tracking._tracking_service.client: 🏃 View run able-bass-627 at: http://127.0.0.1:5000/#/experiments/0/runs/b38184f4f350467fabb66aca3e1f2263.
2024/10/31 00:44:15 INFO mlflow.tracking._tracking_service.client: 🧪 View experiment at: http://127.0.0.1:5000/#/experiments/0.
Model logged with accuracy: 1.0
Step 3: Deploy the Model#
In terminal, run:
MLFLOW_TRACKING_URI=http://127.0.0.1:5000 mlflow models serve -m "runs:/<run_id>/knn_model" -p 5001
Replace <run_id> with the actual run ID from MLflow UI
Note: If you run into an error like this
mlflow.exceptions.MlflowException: Could not find the pyenv binary. See https://github.com/pyenv/pyenv#installation for installation instructions.
Then please run this in the terminal first:
PATH=”\(HOME/.pyenv/bin:\)PATH”
Then run the following command and replace <run_id> with the actual run ID from MLflow UI
MLFLOW_TRACKING_URI=http://127.0.0.1:5000 mlflow models serve -m “runs:/<run_id>/knn_model” -p 5001
Running the curl command will send a request to the model server and print the response, allowing you to verify that the server is working correctly.
In the terminal, run:
curl http://127.0.0.1:5001/invocations -H "Content-Type:application/json" --data '{"dataframe_records": [{"sepal length (cm)": 5.1, "sepal width (cm)": 3.5, "petal length (cm)": 1.4, "petal width (cm)": 0.2}]}'
Explanation:#
URL: The URL of the deployed model server is `http://127.0.0.1:5001/invocations.
Header: The
Content-Typeheader is set toapplication/json.Data: The input data is provided in the
dataframe_recordsformat as a JSON string.
Here is the full example in Python
Python Example#
import requests
import pandas as pd

# Define the URL of the deployed model
url = 'http://127.0.0.1:5001/invocations'

# Define the input data
input_data = pd.DataFrame({
    "sepal length (cm)": [5.1],
    "sepal width (cm)": [3.5],
    "petal length (cm)": [1.4],
    "petal width (cm)": [0.2]
})

# Convert the input data to the required format
data = {"dataframe_records": input_data.to_dict(orient='records')}

# Send the request to the model server
response = requests.post(url, json=data)

# Print the response
print("Response status code:", response.status_code)
print("Response JSON:", response.json())
Step 4: Create a Streamlit App#
Do a pip install streamlit if this is your first time using it
# app.py

import streamlit as st
import pandas as pd
import requests
from sklearn.datasets import load_iris

# Define the URL of the deployed model
url = 'http://127.0.0.1:5001/invocations'

# Load the Iris dataset
iris = load_iris()
iris_data = pd.DataFrame(data=iris.data, columns=iris.feature_names)
iris_data['species'] = pd.Categorical.from_codes(iris.target, iris.target_names)

# Streamlit app
st.title('Iris Classification')

st.write("This app predicts the Iris species based on user input features.")

# # Display the training data
# st.write("### Training Data")
# st.dataframe(iris_data)

# st.write("### Enter the Iris features")

# User input for Iris features
sepal_length = st.slider("Sepal Length (cm)", min_value=0.0, max_value=10.0, step=0.1)
sepal_width = st.slider("Sepal Width (cm)", min_value=0.0, max_value=10.0, step=0.1)
petal_length = st.slider("Petal Length (cm)", min_value=0.0, max_value=10.0, step=0.1)
petal_width = st.slider("Petal Width (cm)", min_value=0.0, max_value=10.0, step=0.1)

# Prediction
input_data = pd.DataFrame({
    "sepal length (cm)": [sepal_length],
    "sepal width (cm)": [sepal_width],
    "petal length (cm)": [petal_length],
    "petal width (cm)": [petal_width]
})

if st.button("Predict"):
    # Convert the input data to the required format
    data = {"dataframe_records": input_data.to_dict(orient='records')}

    # Make a prediction
    response = requests.post(url, json=data)

    if response.status_code == 200:
        prediction = response.json()
        predicted_class = iris.target_names[prediction['predictions'][0]]
        st.write(f"Predicted Iris Species: {predicted_class}")

        # Fetch and display an image of the predicted flower
        image_urls = {
            "setosa": "https://upload.wikimedia.org/wikipedia/commons/a/a7/Irissetosa1.jpg",
            "versicolor": "https://upload.wikimedia.org/wikipedia/commons/2/27/Blue_Flag%2C_Ottawa.jpg",
            "virginica": "https://upload.wikimedia.org/wikipedia/commons/thumb/f/f8/Iris_virginica_2.jpg/1200px-Iris_virginica_2.jpg"
        }

        image_url = image_urls.get(predicted_class, "")
        if image_url:
            st.image(image_url, caption=f"{predicted_class} Flower", width=250)
        else:
            st.write("Image not available for the predicted class.")
    else:
        st.write(f"Error: {response.status_code}")
4. Running the Application#
Train and Log the Model:
python train.pyServe the Model:
mlflow models serve -m runs:/<run_id>/iris_rf_model -p 5001
Run the Streamlit App:
streamlit run app.py
5. Conclusion#
MLflow helps in managing the ML lifecycle.
Streamlit provides an easy way to create interactive web applications for ML models.
Combining both tools allows for efficient model deployment and user interaction.